3D Opportunity Cone
 By LuxAlgoMar 30, 2026
3D Opportunity Cone is an indicator on Vela, our next-generation charting platform, written in Pine Script®.
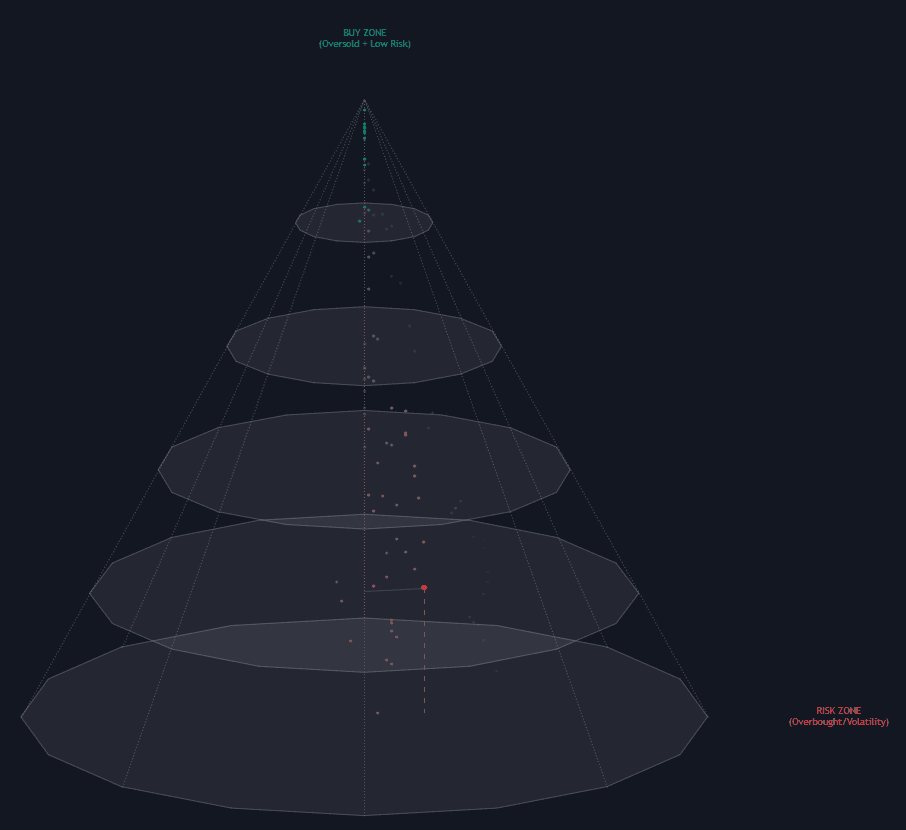
3D Opportunity Cone compresses value, risk, and participation into one geometric read. In the spirit of probability cones (bounding where conditions sit rather than calling a price), it projects a three-dimensional cone to the right of the chart, anchored to a simple moving average, and plots the market as a live point inside it. Three coordinates place that point: height comes from the Stochastic oscillator (higher means more oversold value), radius from ATR (nearer the center means contained volatility), and angle from normalized volume (the conviction behind the move).
How to Trade the 3D Opportunity Cone?
- Buy Zone (apex): the point sits high in the cone, close to the center (volume only rotates the point around the axis). Value and low risk aligned for longs, pullback entries, or early reversals.
- Risk Zone (base): the point drifts low and away from the center. Overbought, volatility-heavy conditions better suited to caution, profit-taking, or tighter stops.
- The trail: a fading string of historical points shows how the market traveled through the space, red toward risk and green toward value, so you catch transitions instead of reacting to one bar.
The cone never says buy or sell; it grades the quality of current conditions so entries found with structure or price action can be filtered before committing.
3D Opportunity Cone Settings
- Evaluation Lookback: period behind the Stochastic, ATR, and volume normalization; shorter reads react faster, longer ones smooth the point's path.
- Cone Scale / X Offset (Bars) / 3D Tilt: sizing, placement, and perspective of the projection so it sits cleanly beside your candles.
- Trail Length: how many past market states stay visible, more context versus a cleaner cone.
Frequently Asked Questions
Free to use
Run it on Vela. Go further with a paid plan.
- Up to 500 strategy alerts, with webhook automation
- Up to 10× the chart history of Free
- Orderflow lookback up to full history
- More Quant usage to customize it, plus extra usage when you need it
- Futures data alongside crypto, stocks, forex and commodities
Also works on

Related indicators
All 5 Probability Cones indicators
Run it on Vela. Make it yours with Quant.
Open this indicator free on Vela, our next-generation charting platform. Then ask Quant, our coding agent built into Vela, to retune it or turn it into a backtested strategy of your own.