Signal Hygiene
 By LuxAlgoApr 8, 2026
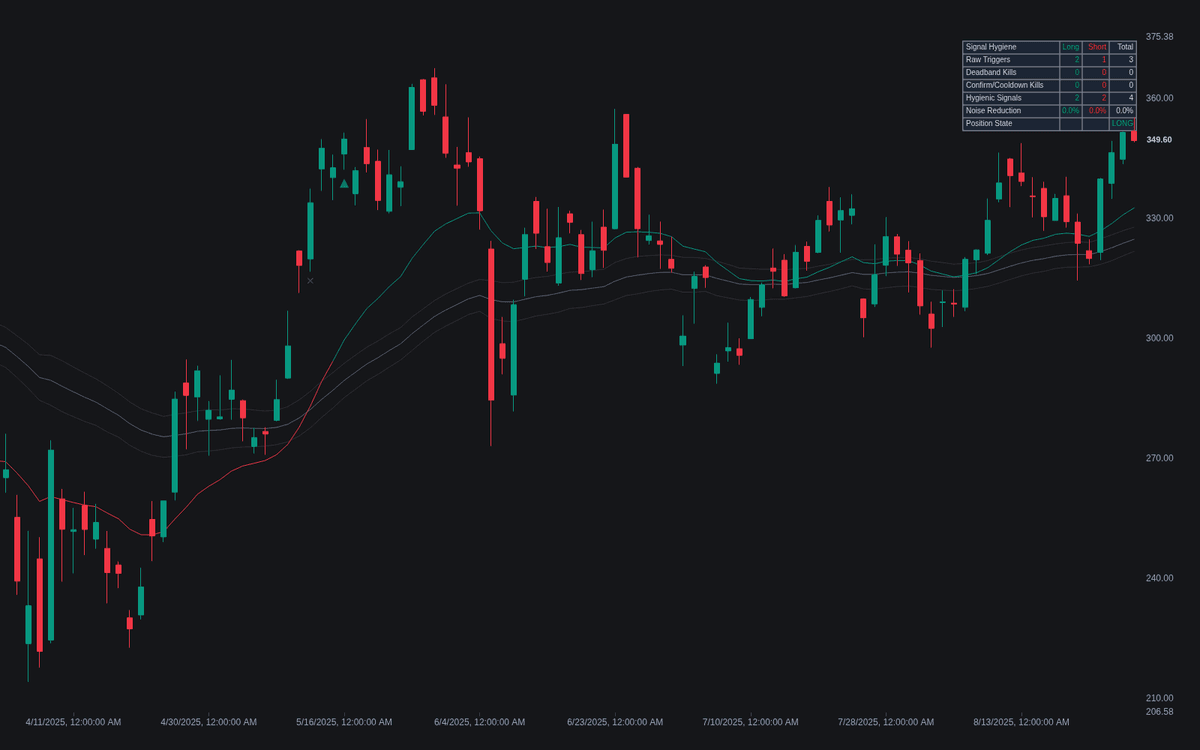
Signal Hygiene makes signal hygiene visible: it stands a five-layer cleaning stack between a raw trigger stream and the signals you act on, and counts what the stack removes. The default triggers come from a deliberately noisy 20/50 EMA cross demo; the same stack can clean any external plot instead.
How to Trade the Signal Hygiene?
- Hygienic triangles: the signal cleared every enabled layer — the stream the primary alerts fire on.
- Raw x-marks: the unfiltered stream, kept as faded marks and separate alerts for A/B comparison; intrabar they can appear and vanish — exactly what the stack removes.
- Deadband zone: in demo mode, the shaded band around the slow average — crosses that never clear it never flip the state.
- Suppression dashboard: raw counts, per-stage kills, survivors, and the noise-reduction percentage, split long and short.
Each layer buys reliability with lateness; the dashboard makes that trade measurable.
Signal Hygiene Settings
- Trigger Mode (default MA Cross (Built-In Demo)).
- External Signal (default close), External Center Level (default 0), External Deadband (default 0).
- Average Type (default EMA), Fast Length (default 20), Slow (default 50): the demo trigger.
- Confirm On Bar Close (default enabled): printed signals are final.
- Deadband (ATR x) (default 0.25) with ATR Length (default 14): demo hysteresis width.
- Confirmation Bars (default 1): bars a new state must hold; reverting flips are cancelled.
- Cooldown Bars (default 5): minimum spacing between hygienic signals.
- One Signal Per State (De-Dup) (default enabled): suppresses same-direction repeats until the state resolves.
- Volume Confirmation (default disabled) with Length (default 20) and Mult (default 1): above-average-volume gate.
- Markers, demo averages, the deadband zone, and the dashboard are shown by default.
Frequently Asked Questions
How does this relate to repaint-safe engineering?
Bar-close confirmation — the concern Repaint-Safe Engineering treats in depth — is only layer one here. Hysteresis, confirmation, spacing, and position logic handle signals that are repaint-safe yet still too noisy to trade.
How do I clean my own indicator's signals?
Set Trigger Mode to External Source and pick your indicator's plot as the External Signal, then set the center level in the source's own units — 50 for an RSI, 0 for a MACD.
What is the right cooldown?
No standard number exists. Anchor it to the trigger's own timescale — a fraction of its lookback is a sensible start — then check the dashboard: too short lets noise back in, too long swallows genuinely new events.

The Library is free. Quant makes it yours.
Pull any concept or indicator into Quant: rebuild it, retune it, or turn it into a backtested strategy of your own.